These wildlife photography tips will help you take better animal pictures on your safari.
I have over 40 years of African wildlife photography experience and these are a few of the things I have picked up over the years that have helped me improve my images.
-
1. Use a Beanbag or Window Mounted Tripod
Hand holding your camera in safari wildlife photography is often a luxury because of the large lenses which magnify every vibration and the low light of dawn and dusk when the subjects are most active. So some kind of rest to lean your camera equipment on is a very good idea to keep your pictures pin sharp.
Most of your photography on safari will be done from inside a vehicle so a tripod to stabilize your camera is impractical. A beanbag does the job very well and it's very quick to set up. Simply place it on a convenient surface, rest your camera lens on it and click away.
In open safari vehicles, a clamp onto an armrest or seat back is just what the doctor ordered to minimize blur. In closed vehicles, you can make use of window mounts. It's a little more inconvenient than a bean bag because you need to affix the camera to the mount each time you want to take a photo (the mount stays fixed to the window while you drive) but it does the job well.
-
2. Know Your Gear Before You Go
Buying or renting a new camera and/or lens shortly before going on safari is not a good idea if you don't have time to practice and get some experience with it.
A safari is not the best time to learn because wildlife is unpredictable and often they aren't going to give you enough time to fiddle with the camera settings and setup before they disappear into the undergrowth. So you need a reasonable amount of practice with your camera and lens so that you can do things quickly.
Also, it will be a huge disappointment if you go all the way to Africa and your safari pictures are not as good as they should be because you are inexperienced with your equipment. A safari is often a one time trip so you won't get any second chances. Make sure you are well acquainted with your equipment before you go.
Visit your local zoo or safari park to prepare. Pets also make excellent subjects to test your photographic skills on.
-
3. Rule Of Thirds
The temptation to compose images with the subjects slap bang in the middle of the picture is sometimes very strong, but it will improve your safari pictures if you resist.
You can position your wildlife subjects correctly in the frame by making use of the rule of thirds, which makes a lot more sense when you see a graphical representation of it on a photograph (see the image below).
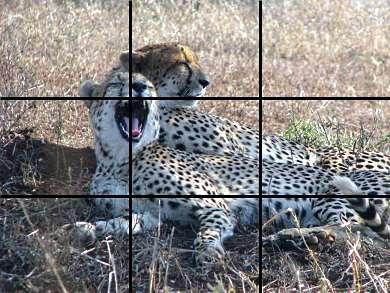
By dividing the image into thirds with grid lines you can find the four optimal locations to put the focal point where the black lines intersect. The cheetahs yawn is the focal point of this photo and it's placed on the top left power point. If it was placed right in the middle of the frame it would have lost a lot of its impact.
When you are out in the field on your safari draw these lines in your imagination as you are composing the picture in the viewfinder and place the focal point accordingly. There are occasions when the rule of third can safely be broken so play around with it until you are confident enough to be able to discern when not to use it.
4. Be Patient
It may sound a little strange but patience is one of those wildlife photography tips that really will improve your wildlife pictures. Why?
Because the most interesting animal pictures are the ones where they exhibit some kind of behaviour other than sleeping or walking around and to capture that takes time and patience.
You could be lucky on your safari and capture something unique straight off the bat but you just never know. And that's another one of the things that make safari wildlife photography so exciting. It's never predictable.
Here's an example where patience bore fruit on a self drive safari I went on in the Kruger Park in South Africa. I had spotted a leopard resting on a branch in a tree and we had been watching her for about 20 minutes when she stretched and clawed her way to the ground.
The leopard was completely out of sight in the long grass at that point and we could have driven on but I decided to exercise some patience and reversed about 200 meters towards a small group of impala grazing quietly.
After 15 minutes of absolutely nothing happening the leopard exploded out of the long grass (we had not seen her creeping closer) and charged the gazelle that scattered quickly to all points of the compass. The leopard had missed her prey and she sat down sheepishly looking forlornly in the direction the impala had run. I managed to get some great photographs which I would have missed if I hadn't been a little patient.
5. Blur The Background
6. Focus on the Eyes
A wildlife photograph where the subjects eyes are out of focus loses a lot of its appeal. The reason is probably that we as humans are naturally drawn towards looking at eyes and if you can't see them due to blurring it's a little jarring.
Whatever the reason, always keep the eyes of your subject in focus and if you can capture the sun glinting in the pupil you get bonus points because that really livens up the picture.
7. Create Active Space
Leave space for animals to move into when you frame your images. If the chameleon was centered or placed on the far left the picture would lose impact. This may seem like one of the obvious wildlife photography tips but in the heat of the moment it's easy to forget the basics.

This is one of those wildlife photography tips that is particularly handy on a safari because often there is vegetation in the image that is distracting and blurring it gives more emphasis to the wildlife subject, such as with the ostrich photo below.

And then on the other hand if you are photographing a herd of elephant you might want to make sure that they are all in focus so you will try and limit the blurring present in the scene.
The fancy name to describe the portion of the scene that appears sharp throughout the whole image is depth of field. But more important then knowing what it's called is knowing how to control it. Three factors affect depth of field: the aperture, the focal length of the lens, and the camera to subject distance.
Of these three, the aperture is the one that you have the most control over on a safari. A big aperture opening (e.g f/4.5) will lead to more background blurring while a small aperture (e.g f/22) will lead to the overall scene being sharper.
I remember which is which by matching up the similar first letters, so Big = Blurred and Small = Sharp. That tends to limit the confusion to a minimum. Make sure you know how to change the aperture opening on your gear before you go on safari.